A High Availability (HA) cluster ensures that your services remain online even if a server hardware failure occurs. This guide walks you through a production-ready setup using Pacemaker, Corosync, and Shared Storage.
1. Prerequisites & Environment
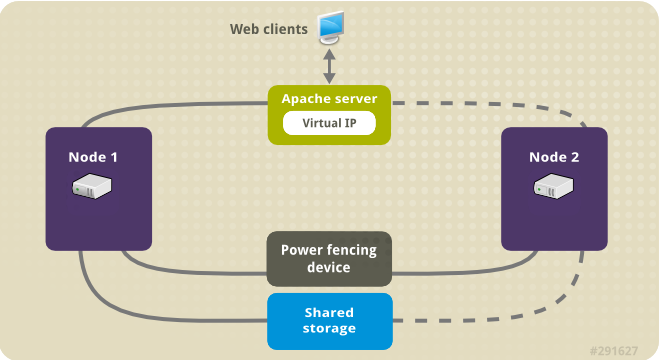
You will need two nodes (servers) running CentOS Stream 9.
- node1: 192.168.1.10
- node2: 192.168.1.11
- Virtual IP (VIP): 192.168.1.50 (This is the IP clients will connect to)
On both nodes, add the following to /etc/hosts:
Bash
192.168.1.10 node1
192.168.1.11 node2
2. Installation and Initial Setup
Run these commands on both nodes to prepare the environment.
Enable HA Repositories and Install Software
Bash
# Enable the HA repository
sudo dnf config-manager --set-enabled highavailability

# Install the cluster stack and web server
sudo dnf install -y pacemaker pcs corosync resource-agents fence-agents-all nfs-utils nginx
Firewall Configuration
Allow cluster communication through the firewall:
Bash
sudo firewall-cmd --permanent --add-service=high-availability
sudo firewall-cmd --reload
Set Cluster Password
The hacluster user is created automatically. Set a password for it:
Bash
sudo passwd hacluster
sudo systemctl enable --now pcsd
3. Creating the Cluster
Run these commands on Node 1 only to link the servers together.
Bash
# Authenticate the nodes
sudo pcs host auth node1 node2 -u hacluster

# Create and start the cluster
sudo pcs cluster setup my_cluster node1 node2
sudo pcs cluster start --all
sudo pcs cluster enable --all
4. Configuring Fencing (STONITH)
Fencing is mandatory for data integrity when using shared storage. It ensures a “rogue” node is powered off before the healthy node takes over.
Setup a Quorum Device (Optional Tie-breaker)
On a third machine (not node1 or node2):
Bash
sudo dnf install -y corosync-qnetd
sudo systemctl enable --now corosync-qnetd
Then, on Node 1, add it:
Bash
sudo pcs quorum device add model net host=<QNETD_IP>
Enable STONITH
If you have IPMI or a Cloud Fencing agent, configure it now. For testing purposes only, you can disable it (not recommended for production):
Bash
sudo pcs property set stonith-enabled=false
5. Shared Storage & Application Resources
We will group the Virtual IP, NFS Mount, and Nginx into a single “stack” so they always move together.
Prepare the Web Server (Both Nodes)
Bash
sudo systemctl disable --now nginx
Create the Stack (Node 1 only)
Bash
# 1. Create the Virtual IP
sudo pcs resource create virtual_ip ocf:heartbeat:IPaddr2 ip=192.168.1.50 cidr_netmask=24 op monitor interval=30s

# 2. Create the NFS Mount (Ensure NFS Server is ready)
sudo pcs resource create web_fs ocf:heartbeat:Filesystem device="<NFS_IP>:/var/www/shared" directory="/usr/share/nginx/html" fstype="nfs" op monitor interval=20s

# 3. Create the Nginx Resource
sudo pcs resource create web_server ocf:heartbeat:nginx configfile="/etc/nginx/nginx.conf" op monitor interval=30s

# 4. Group them for automatic failover order
sudo pcs resource group add web-stack virtual_ip web_fs web_server
6. Troubleshooting & Management
Use these commands to maintain your cluster:
| Command | Action |
pcs status | Check the health of all nodes and resources. |
pcs resource cleanup | Clear error messages after fixing a problem. |
pcs node standby node1 | Manually move all resources to the other node. |
pcs node unstandby node1 | Bring a node back into the cluster rotation. |
Common Error: “Failed Actions”
If you see red text in pcs status, it means a resource failed to start. Fix the configuration (check /var/log/messages) and then run:
Bash
sudo pcs resource cleanup
Summary
Building a cluster on CentOS Stream 9 provides a robust foundation for critical applications. By grouping your IP, Storage, and Services, you ensure that even in the event of a total node crash, your users remain connected to your data.